Food for thought....here is a compilation of my favorite halloween recipes, ideas, and trends! Here you will find some classics mixed in with some unique creations enjoy!
- Snacks
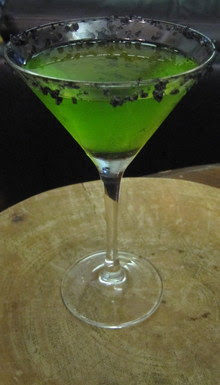
Trick-or-Treat-tini
SERVES 1, EASILY DOUBLED OR TRIPLED
- 1 1/2 ounce Midori
- 1 1/2 ounce Malibu Rum
- 1 1/2 ounce Special Sour mix (see recipe below)
- Black Lava Sea Salt for rim
- Gummy eyeball (optional)
- Rim a martini glass in black lava sea salt if desired. Fill a shaker halfway with ice cubes. Add equal parts Midori, Malibu Rum, and Special Sour mix. Shake and strain into a martini glass. Sprinkle a few grains of salt into your glass if desired, for a dramatic, Halloween-y effect. Eyeballs optional. ENJOY!
- SPECIAL SOUR MIX: 2 cups coconut water + 1/3 cup agave + Juice of two Meyer lemons Combine ingredients in a glass jar with a lid and stir to mix. Refrigerate until chilled. Use as needed for Trick-or-Treat-tinis.
Read more: http://www.food52.com/recipes/7151_trickortreattini#ixzz131ME4JM4
SERVES 1, EASILY DOUBLED OR TRIPLED
- 1 1/2 ounce Midori
- 1 1/2 ounce Malibu Rum
- 1 1/2 ounce Special Sour mix (see recipe below)
- Black Lava Sea Salt for rim
- Gummy eyeball (optional)
- Rim a martini glass in black lava sea salt if desired. Fill a shaker halfway with ice cubes. Add equal parts Midori, Malibu Rum, and Special Sour mix. Shake and strain into a martini glass. Sprinkle a few grains of salt into your glass if desired, for a dramatic, Halloween-y effect. Eyeballs optional. ENJOY!
- SPECIAL SOUR MIX: 2 cups coconut water + 1/3 cup agave + Juice of two Meyer lemons Combine ingredients in a glass jar with a lid and stir to mix. Refrigerate until chilled. Use as needed for Trick-or-Treat-tinis.
"Great Pumpkin" Truffles

makes 30-40 truffles
8 ounces top quality 70% bittersweet chocolate, finely chopped
- * In a small bowl make the pumpkin spice blend by sifting together 1 tablespoon cinnamon, 1 tablespoon ginger, 1/2 tablespoon nutmeg, and 1/2 teaspoon allspice. Set aside.
- Put chocolate into a large heatproof bowl. Bring the cream, the corn syrup and the 7 teaspoons of the pumpkin spice mix to a light boil in a small saucepan over medium-high heat; pour over the chocolate in bowl. Let stand 5 minutes, then gently stir until smooth. Add the softened butter and stir gently until it is fully incorporated. Let stand uncovered to cool, stirring occasionally to keep a skin from forming.
- When the ganache has cooled to the consistency of toothpaste, scrape it into a pastry bag fitted with a 1/2-inch plain tip. Pipe 1-inch-diameter mounds spaced 1 inch apart on a parchment paper-covered baking sheet. To pipe the mounds, hold the pastry bag at a slight angle and allow the tip to touch the parchment as you begin to pipe. Once you have formed the mound, stop squeezing and lift the tip straight up, leaving a small tail on the top of each mound, like a hershey’s kiss. You can also use a spoon and drop small mounds of ganache onto the baking sheet. Let the truffles harden at room temperature for a couple of hours (or in the refrigerator for 15 minutes), until they are hard enough to roll with your hands.
- Place the cocoa powder, and the chopped pecans in separate bowls.
- Roll each cooled ball of ganache between the palms of your hands to form into a sphere and to soften the outside of the ball. Immediately drop them into the “topping” bowl of your choice, and roll them around with a fork or spoon to evenly coat the ganache with either the cocoa or nuts. Move to a parchment covered sheet tray, then to the fridge for about 15 minutes to set. Recover any extra cocoa and minced nuts for future use.Read more: http://www.food52.com/recipes/7149_great_pumpkin_truffles#ixzz12jmZIMnI
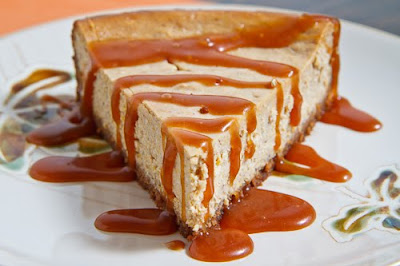
Pumpkin pie cheesecake
although this dish may go a bit better on the thanksgiving table I couldn't resist adding it! many thanks to http://closetcooking.blogspot.com for the idea!
Ingredients:2 cups gingersnap cookie crumbs
Directions:
8 ounces top quality 70% bittersweet chocolate, finely chopped
1/2 cup heavy cream
2 teaspoons light corn syrup
7 teaspoons pumpkin spice blend* (or more to your taste)
1 tablespoon salted butter, softened
1 cup dutch process cocoa powder (I use Valrhona)
6 ounces toasted pecans, finely chopped in a mini-prep
Ingredients:
2 cups gingersnap cookie crumbs
1/3 cup sugar
1/4 teaspoon ground ginger
6 tablespoons butter (melted)
3 (8 ounce) packages cream cheese (room temperature)
3 eggs (slightly beaten)
1 cup brown sugar
1 cup pumpkin puree
1 teaspoon vanilla
1 teaspoon cinnamon
1/2 teaspoon ginger
1/4 teaspoon cloves
1/4 teaspoon nutmeg
Directions:
1. Mix the gingersnap cookie crumbs, ginger and butter and press into the bottom and up 1 inch along the sides of a 9 inch spring form pan.
2. Bake the crust in a preheated 350F oven for 5 minuters and set aside.
3. Cream the cream cheese.
4. Mix in the eggs one at a time followed by the sugar, pumpkin puree, vanilla and then the spices.
5. Pour the mixture into the spring form pans.
6. Bake in a preheated 350F oven until it is set, about 60-70 minutes.
7. Let it cool completely.
8. Chill the cheesecake in the fridge overnight.


